Most adults assume e-bike sizing works exactly like sizing a regular bicycle. It doesn’t. Understanding how e-bike sizing works for adults requires accounting for motor weight, battery placement, and frame geometry changes that simply don’t exist on traditional bikes. Get the size wrong and you’re not just uncomfortable. You’re dealing with a 50-plus pound machine that’s harder to control, harder to stop, and harder to enjoy. This guide walks you through every measurement and adjustment that actually matters, so you can ride confidently from day one.
Table of Contents
- Key Takeaways
- How e-bike sizing works for adults: the core measurements
- Saddle height and position setup
- Handlebar reach and height
- E-bike specific sizing factors
- How to finalize your size with a test ride
- My take on what most buyers get wrong
- Find your fit with Hmpbikes
- FAQ
Key Takeaways
| Point | Details |
|---|---|
| Inseam beats height alone | Measuring your inseam with the book method gives more accurate frame sizing than height charts alone. |
| Standover clearance is a safety issue | E-bikes weigh 20 to 30 kg, so you need more than 1 to 2 inches of clearance for safe mounting and stops. |
| Knee angle drives saddle height | Target a 25 to 35 degree knee bend at the bottom of the pedal stroke for comfort and efficiency. |
| Handlebar reach affects your whole body | Proper reach lets your elbows bend slightly and your shoulders stay relaxed throughout the ride. |
| Test rides confirm what charts can’t | Adjusting saddle and handlebar position during a test ride reveals fit issues no size chart will catch. |
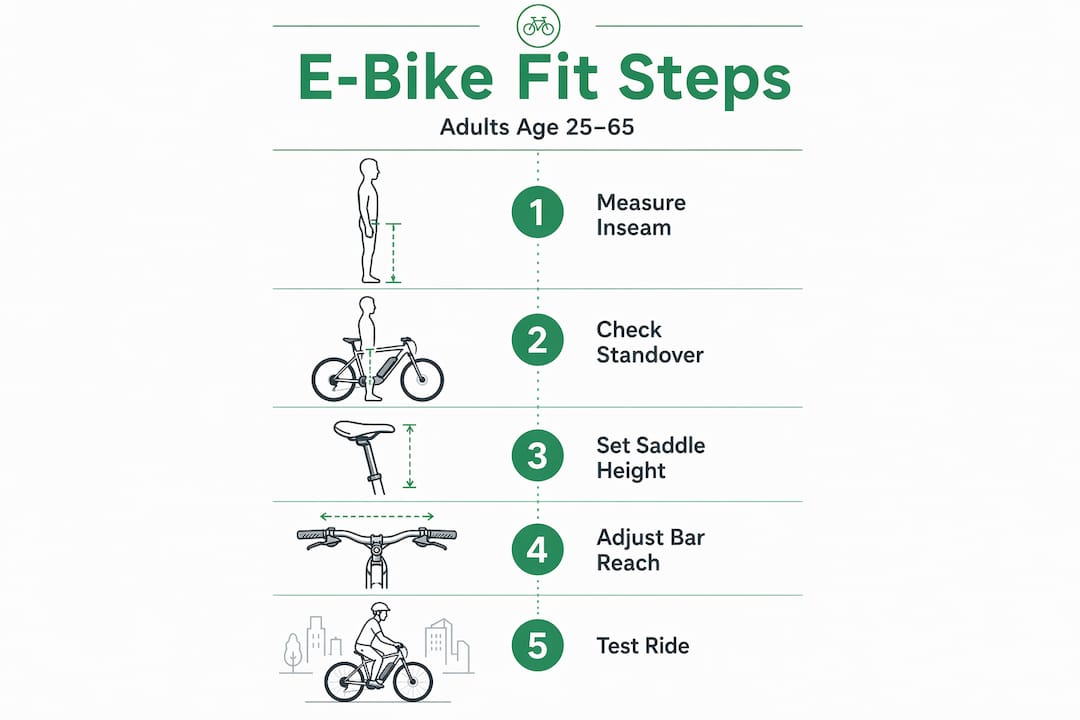
How e-bike sizing works for adults: the core measurements
Before you look at any e-bike size guide or frame size chart, you need three numbers: your height, your inseam, and the standover height of the bike you’re considering. Height is the starting point, but it’s the least precise of the three.
Why inseam matters more than height
Your inseam is the distance from your crotch to the floor. Measuring inseam with a book between your legs is the most reliable method for frame selection. Stand barefoot with your back against a wall, place a hardcover book snugly between your legs like a saddle, and measure from the top of the book spine to the floor. That number is your inseam.

Why does it beat height? Because two people who are both 5’10" can have inseams that differ by three inches. That difference changes everything about how they interact with a frame. Pairing inseam measurement with standover testing consistently produces better fit outcomes than relying on height alone.
Understanding frame size labels
E-bike frames are labeled in two ways: by letter (S, M, L, XL) or by inches and centimeters. Neither system is universal. A “Medium” from one brand may correspond to a 17-inch frame, while another brand’s Medium sits at 19 inches. Always cross-reference the label with the actual frame measurement in the manufacturer’s sizing chart, and compare that against your inseam.
Here’s what to gather before shopping:
- Your inseam measurement in inches
- Your height in feet and inches
- Your arm length (fingertip to fingertip across your chest, divided by two) for reach estimation
- The standover height listed in the bike’s geometry specs
Pro Tip: Never trust a size chart that only lists height ranges. If the chart doesn’t include inseam ranges and standover height, contact the manufacturer directly before buying.
Saddle height and position setup
Getting your saddle right is the single most impactful adjustment you can make. A saddle that’s even one inch too high or too low will cause pain within 20 minutes and long-term joint issues over time.
Setting saddle height
The target is a 25 to 35 degree knee bend at the bottom of the pedal stroke. That range keeps your knees safe, your power output high, and your joints comfortable over long distances.
The quickest way to find your starting point is the heel-on-pedal method:
- Sit on the saddle and place your heel on the pedal at its lowest position.
- Your leg should be fully extended with no hip tilt.
- When you move your foot to the ball-of-foot position (how you actually pedal), your knee will naturally settle into that 25 to 35 degree bend.
- If your hips rock side to side while pedaling, the saddle is too high. Lower it by 3mm increments.
- If you feel pressure at the front of your knee, the saddle is too low. Raise it by 3mm increments.
Hip rocking signals a saddle that’s too high, while anterior knee pain points to one that’s too low. Both are fixable, but you need to recognize the symptom first.
Fore and aft saddle position
Once height is set, adjust the saddle forward or backward using the KOPS method. Aligning a plumb line from your knee to the pedal spindle with cranks horizontal gives you the baseline position for efficient power transfer. Sit on the bike in your normal pedaling position, hold the cranks parallel to the ground, and drop an imaginary vertical line from the front of your kneecap. It should land directly over the pedal axle.
Riders who favor climbing or longer distances often shift the saddle slightly back from KOPS. Riders doing short urban commutes tend to prefer a more neutral or slightly forward position. Neither is wrong. Both should be tested.
Pro Tip: Make one adjustment at a time and ride at least 10 minutes before evaluating. Changing saddle height and position simultaneously makes it impossible to know which change helped.
Handlebar reach and height
Handlebars are where a lot of adult riders silently suffer. Reach that’s too long strains your lower back and neck. Reach that’s too short compresses your chest and makes steering twitchy. Getting this right changes how the entire bike feels.
How to assess your reach
Proper handlebar reach allows a slight bend in your elbows and relaxed shoulders throughout the ride. When you’re seated and holding the bars in your natural grip position, your elbows should never be locked straight. Locked elbows transfer every road vibration directly into your shoulders and neck.
Here are the key checkpoints for handlebar fit:
- Elbow angle: Aim for a 10 to 15 degree bend when gripping the bars comfortably
- Shoulder position: Shoulders should sit down and back, not hunched toward your ears
- Neck angle: You should be able to look ahead without straining your neck upward
- Wrist alignment: Wrists should be neutral, not bent sharply up or down
Upright vs. forward position
Handlebars set higher than the saddle create an upright riding position, which reduces back strain and improves visibility in traffic. This suits commuters, delivery riders, and anyone spending time in stop-and-go urban environments. Bars set lower than the saddle shift weight forward, which improves aerodynamics but demands more from your core and lower back.
For most adult riders using e-bikes in Northern California’s urban and mixed-terrain environments, an upright or neutral position is the practical choice. You’re not racing. You’re commuting, running errands, or exploring. Comfort over miles matters more than aerodynamic efficiency.
Stem length and handlebar type also affect reach. A shorter stem brings the bars closer. Wider bars improve stability but require more shoulder width. These are components you can swap without buying a new bike, which is worth knowing if your fit is close but not perfect.
E-bike specific sizing factors
This is where e-bike sizing diverges most sharply from traditional bike fitting. The motor, battery, and reinforced frame add significant weight that changes how the bike handles, how it tips, and how much clearance you actually need.
Standover clearance and weight impact
E-bikes weigh between 20 and 30 kg, compared to 8 to 12 kg for a standard bicycle. That weight difference has real consequences when you’re stopping quickly, stepping off at a light, or catching yourself from a tip. You need standover clearance of at least 2 to 3 inches on an e-bike, not the 1-inch minimum often cited for traditional bikes.
Here’s a quick comparison of how frame type affects fit and function for adult riders:
| Frame type | Best for | Standover clearance | Mounting ease |
|---|---|---|---|
| Step-over (diamond) | Long rides, performance | 2 to 3 inches minimum | Moderate |
| Step-through | Urban commuting, frequent stops | Not applicable | Very easy |
| Moped-style | Delivery, urban, mixed use | Varies by model | Easy to moderate |
When step-through frames make sense
Step-through frames simplify mounting and dismounting on heavy e-bikes, especially in traffic or when wearing work clothing. If you have limited hip flexibility, knee issues, or you’re stopping and starting constantly throughout your ride, a step-through design removes a real physical barrier. It’s not just about convenience. On a 60-pound e-bike, a clumsy dismount can result in a fall.
For urban riders, choosing a frame that’s slightly smaller than your maximum fit range also improves handling. A smaller frame sits lower, reduces the center of gravity, and makes the bike easier to maneuver at low speeds. For longer recreational rides or hilly terrain, a properly sized or slightly larger frame provides more stability and pedaling leverage.
How to finalize your size with a test ride
No chart replaces the information a 10-minute test ride gives you. Here’s how to use that time well:
- Perform the standover test first. Straddle the bike flat-footed. You want at least 2 inches of clearance between you and the top tube.
- Sit on the saddle and check your foot position. You should be able to touch the ground with the balls of your feet, not your full foot flat.
- Pedal slowly and notice your knee bend. If your knees are nearly straight at the bottom of the stroke, the saddle is too high.
- Grip the handlebars and check your elbows. Locked arms mean the reach is too long or the bars are too low.
- Ride over a small bump or uneven surface. If you feel like the bike is pulling you rather than you controlling it, the frame may be too large.
Pro Tip: Bring your inseam measurement to the shop. Ask staff to set the saddle height before you ride, not after. Starting from a correct baseline makes the test ride far more informative.
If you’re between sizes, your riding style should decide. Commuters and urban riders generally do better on the smaller size. Riders logging longer distances on open roads or hills benefit from the larger size.
My take on what most buyers get wrong
I’ve watched a lot of adults walk into a shop, point at a bike, and ask “does this come in my size?” as if e-bike sizing works like buying jeans. It doesn’t. And the consequences of getting it wrong are more serious than with a regular bike.
The biggest mistake I see is trusting manufacturer height charts without checking inseam or standover. Charts are starting points, not answers. I’ve seen riders who are technically within the height range for a Medium frame, but whose inseam puts them dangerously close to the top tube on an emergency stop. That’s not a minor inconvenience on a 55-pound machine.
The second mistake is ignoring how the motor and battery placement shifts the bike’s center of gravity. A rear-hub motor lowers weight at the back axle. A mid-drive motor centers weight near the bottom bracket. Both change how the bike tips and how much effort it takes to hold upright at a stop. Fit isn’t just about leg extension. It’s about whether you can confidently manage the bike’s weight when it matters most.
What I’ve found works: measure your inseam before you do anything else, test standover clearance on every bike you consider, and never finalize a purchase without at least one test ride with saddle and handlebar adjustments made first. Proper bike fit improves pedaling efficiency and prevents the handling issues that come from unbalanced weight distribution. That matters even more when the bike weighs twice as much as a traditional one.
— Peter Chu
Find your fit with Hmpbikes
Getting the right size is step one. Getting the right bike is step two. At Hmpbikes, we carry a range of adult electric mopeds designed for real-world Northern California riding, from daily commutes to delivery routes to weekend rides across the Bay Area.

Not sure which model fits your body type and riding style? The LIVA 7 moped-style e-bike is built to accommodate a wide range of adult riders, while the INNO-A Pro offers a more performance-oriented geometry for riders who want a precise fit. You can also schedule a test ride at our location to experience proper sizing firsthand before committing. Our team helps you dial in saddle height, handlebar position, and frame selection so you leave with a bike that actually fits.
FAQ
What measurements do I need for e-bike sizing?
You need your height, inseam, and the standover height of the bike you’re considering. Inseam is the most critical measurement because it directly determines how safely you can straddle and control the frame.
How do I know if an e-bike frame is too big?
If you can’t touch the ground with the balls of your feet while seated, or if the bike feels like it’s pulling you forward rather than responding to your steering, the frame is likely too large. A proper standover clearance of at least 2 inches is the first check.
What size e-bike do I need for a 5’8" adult?
Most 5’8" adults fit a Medium frame, but inseam length determines the final answer. A rider at 5’8" with a 30-inch inseam may need a different size than one with a 33-inch inseam. Always cross-reference height with inseam against the manufacturer’s frame size chart.
Are step-through e-bikes better for beginners?
Step-through frames make mounting and dismounting significantly easier on heavy e-bikes, which reduces fall risk for new riders. They’re especially practical for urban commuting, frequent stops, and riders with limited hip or knee flexibility.
Can I adjust an e-bike to fit after buying it?
Yes. Saddle height, saddle fore/aft position, and handlebar height are all adjustable on most e-bikes. These adjustments can correct minor fit issues, but they can’t compensate for a frame that’s significantly too large or too small. Getting the frame size right from the start is what makes those fine-tune adjustments actually work.